Canary Release With Cloudflare
- Background
- Why use Easegress and Cloudflare
- Based on geographic location
- Based on user devices
- Based on user OS
Background
A canary release is a software testing technique used to reduce the risk of introducing a new software version into production by gradually rolling out the change to a small subset of users, before rolling it out to the entire platform/infrastructure.
Advantages
- Service Evaluation: You can evaluate multiple service versions side by side using canary release in real-world environments with actual users and use cases.
- Zero downtime: Canary release does not cause downtime
- Simple Rollback Mechanism: You can always easily roll back to the previous version.
Key point
- Traffic tagging: To categorize traffic based on various business attributes such as user devices, geographic locations, or user attributes(e.g. age, gender, level, etc.), we can apply different labels or tags to the traffic. It’s important to note that IP addresses should not be used as user tags as they can be inaccurate and inconsistent.
- Traffic scheduling: Once traffic is tagged, we can use traffic rules to schedule specific traffic to a designated Canary. For instance, traffic from an iPhone user in Beijing could be directed to a new version of a service.
Why use Easegress and Cloudflare
- For traffic tagging, Using Cloudflare we can easily label the traffic.
- Geographic Location: Cloudflare offers a feature called Managed Transforms, which can be used to identify the geographic location of a user.
- User Device: Using Workers, we can extract information about the user’s device, operating system, and web browser from the
User-Agentfield of the HTTP request. - User’s Customized Label: Using Cloudflare Rules, it is easy to extract the user’s customized business label from HTTP request headers (such as: Cookies, etc.)
- For traffic scheduling, Easegress can be used to route traffic to different canary releases.
Based on geographic location
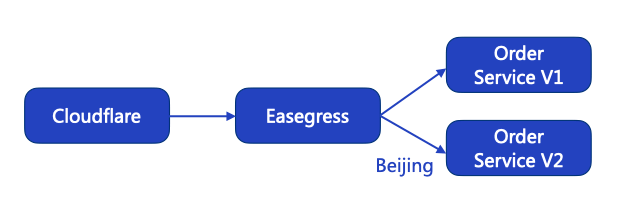
Suppose we run an e-Commerce service, and we recently upgraded our Order Service from version 1 to version 2. To ensure that our users have the best experience, we want to route the users who are accessing our service from Beijing to use the new Order service (version 2).
Download the latest Service code from canary-case-1
1. Traffic tagging
To determine the geographic location of a user, we can leverage the CF-IPCity field in Cloudflare’s HTTP header. We need to first enable the “Add visitor location headers” option in the Cloudflare dashboard. (Cloudflare Dashboard -> Rules -> Transform Rules -> Managed Transforms -> enabled “Add visitor location headers” )
2. Traffic scheduling rules:
Save the following YAML code to order-service.yaml and make sure to replace the servers configuration with your own.
name: order-pipeline
kind: Pipeline
flow:
- filter: order-service
filters:
- name: order-service
  kind: Proxy
  pools:
  - servers:
    - url: http://0.0.0.0:5002  # new version
    filter:
      headers:
        cf-ipcity: # Cloudflare geographic location header
          exact: Beijing # the traffic from Beijing should be directed to the new version
  - servers:
    - url: http://0.0.0.0:5001  # old version
Then create the order pipeline with the command:
egctl create -f order-service.yaml
Save below YAML to ecommerce-server.yaml.
kind: HTTPServer
name: ecommerce-server
port: 8888
https: false
keepAlive: true
keepAliveTimeout: 75s
maxConnection: 10240
cacheSize: 0
rules:
  - paths:
    - pathPrefix: /order
      backend: order-pipeline
    - pathPrefix: /notify
      backend: notify-pipeline
Then create the HTTP server with command:
egctl create -f ecommerce-server.yaml
Send a request to e-Commerce service:
curl http://127.0.0.1:8888/order -H "cf-ipcity: Beijing"
{"order_id":"5245000","role_id":"44312","order_status":1,"order_version":"v2"}

curl http://127.0.0.1:8888/order -H "cf-ipcity: Shanghai"
{"order_id":"5245000","role_id":"44312","order_status":1,"order_version":"v1"}
Based on user devices
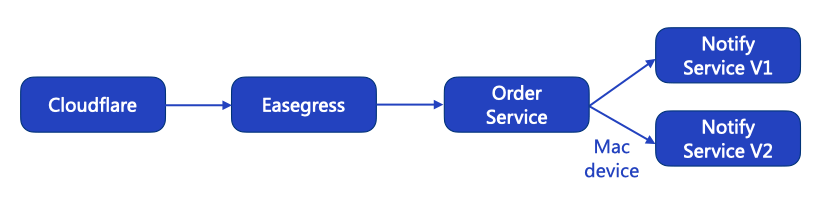
In real-world scenarios, services are usually interconnected and depend on each other to provide a seamless experience for the customer. In our case, we recently upgraded our Notify Service from version 1 to version 2. To ensure that our users have a holistic experience, we want to route users who are accessing our service from a Mac device to use the new version of our Notify Service (version 2).
Download the latest Service code from canary-case-2
1. Traffic tagging
To determine the user’s device and system, we can extract it from the User-Agent field in HTTP request by Workers.
We offer an easy way to parse User-Agent in easegress-rust-uaparser library.
git clone https://github.com/megaease/easegress-rust-uaparser.git
Go to the easegress-rust-uaparser/cloudflare directory and deploy the worker by using the wrangler command.
npx wrangler publish
Go to the Cloudflare website configuration page and configure Workers Routes.
2. Traffic scheduling rules
Save the following YAML code to order-service.yaml, and make sure to replace the servers configuration with your own.
name: order-pipeline
kind: Pipeline
flow:
- filter: order-service
filters:
- name: order-service
  kind: Proxy
  pools:
  - servers:
    - url: http://0.0.0.0:5003 # order service
Then update the order pipeline with the command:
egctl apply -f order-service.yaml
Save the following YAML code to notify-service.yaml, and make sure to replace the servers configuration with your own.
name: notify-pipeline
kind: Pipeline
flow:
- filter: notify-service
filters:
- name: notify-service
  kind: Proxy
  pools:
  - servers:
    - url: http://0.0.0.0:5002  # new version
    filter:
      headers:
        x-ua-device:
          exact: Mac # the traffic from Mac device should be directed to the new version
  - servers:
    - url: http://0.0.0.0:5001  # old version
Then create the notify pipeline with the command:
egctl create -f notify-service.yaml
Send a request to e-Commerce service:
curl http://127.0.0.1:10080/ecommerce -H "user-agent:Mozilla/5.0 (Linux; Android 4.4.2; GT-I9505 Build/KOT49H) AppleWebKit/537.36 (KHTML, like Gecko) Chrome/37.0.2062.117 Mobile Safari/537.36"
{"order_id":"5245000","role_id":"44312","order_status":1,"order_version":"v2","notify_status":1,"notify_version":"v1"}

curl http://127.0.0.1:10080/ecommerce -H "user-agent:Mozilla/5.0 (Macintosh; Intel Mac OS X 10_15_7) AppleWebKit/537.36 (KHTML, like Gecko) Chrome/110.0.0.0 Safari/537.36"
{"order_id":"5245000","role_id":"44312","order_status":1,"order_version":"v2","notify_status":1,"notify_version":"v2"}
Based on user OS
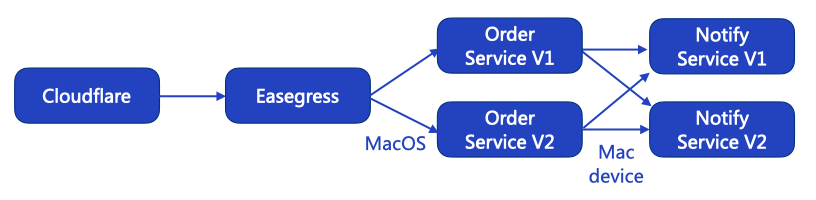
Suppose both the Order service and Notify service have been upgraded simultaneously. The user who is accessing our service from a MacOS should be routed to the new version of the Order service (v2), and from Mac device should be routed to the new version of the Notify service (v2).
You may think Cloudflare’s Workers is not suitable for your needs, there is another easy way to parse User-Agent with Easegress’s WASM.
Download the latest Service code from canary-case-3
1. Traffic tagging
Using Easegress’s WASM to parse the User-Agent.
Download easegress-rust-uaparser
git clone https://github.com/megaease/easegress-rust-uaparser.git
Go to the easegress-rust-uaparser/binary directory and just use the easegress.wasm file directly. It will parse the User-Agent and add the x-ua-device and x-ua-os headers to the HTTP request.
2. Traffic scheduling rules
Save the following YAML code to order-service.yaml, and make sure to replace the servers configuration and wasm file path with your own.
name: order-pipeline
kind: Pipeline
flow:
- filter: wasm
- filter: order-service
filters:
- name: wasm # parse user-agent, add `x-ua-device` and `x-ua-os` headers to the HTTP request.
  kind: WasmHost
  maxConcurrency: 2
  code: /<Path>/easegress.wasm  # easegress.wasm file path
  timeout: 100ms
- name: order-service
  kind: Proxy
  pools:
  - servers:
    - url: http://0.0.0.0:5002 # new version of order service
    filter:
      headers:
        x-ua-os: # Easegress's user OS header
          exact: MacOS # the traffic from MacOS should be directed to the new version
  - servers:
    - url: http://0.0.0.0:5001 # old version of order service
Then update the order pipeline with the command:
egctl apply -f order-service.yaml
Send a request to e-Commerce service:
curl http://127.0.0.1:10080/ecommerce -H "user-agent:Mozilla/5.0 (Linux; Android 4.4.2; GT-I9505 Build/KOT49H) AppleWebKit/537.36 (KHTML, like Gecko) Chrome/37.0.2062.117 Mobile Safari/537.36"
{"order_id":"5245000","role_id":"44312","order_status":1,"order_version":"v1","notify_status":1,"notify_version":"v1"}

curl http://127.0.0.1:10080/ecommerce -H "user-agent:Mozilla/5.0 (Macintosh; Intel Mac OS X 10_15_7) AppleWebKit/537.36 (KHTML, like Gecko) Chrome/110.0.0.0 Safari/537.36"
{"order_id":"5245000","role_id":"44312","order_status":1,"order_version":"v2","notify_status":1,"notify_version":"v2"}